
从零开发 Agent CLI(一):项目初始化及工程基建
搭建一个 CLI 项目的基础设施看似只是处理一堆配置文件,但只有真正踩过坑,才知道其中的痛处。本文将通过实际代码,带你构建一套可直接用于生产环境的 TypeScript 命令行工具工程:
- ESM 与 CJS 双格式输出,通过
npx dsk即可直接运行 - 采用严格模式的 tsconfig 配置,类型安全性拉满
- 集成 Vitest 测试框架、ESLint flat config 以及 Prettier 代码格式化工具
- 利用 tsup 进行单文件打包,产物大小小于 2KB
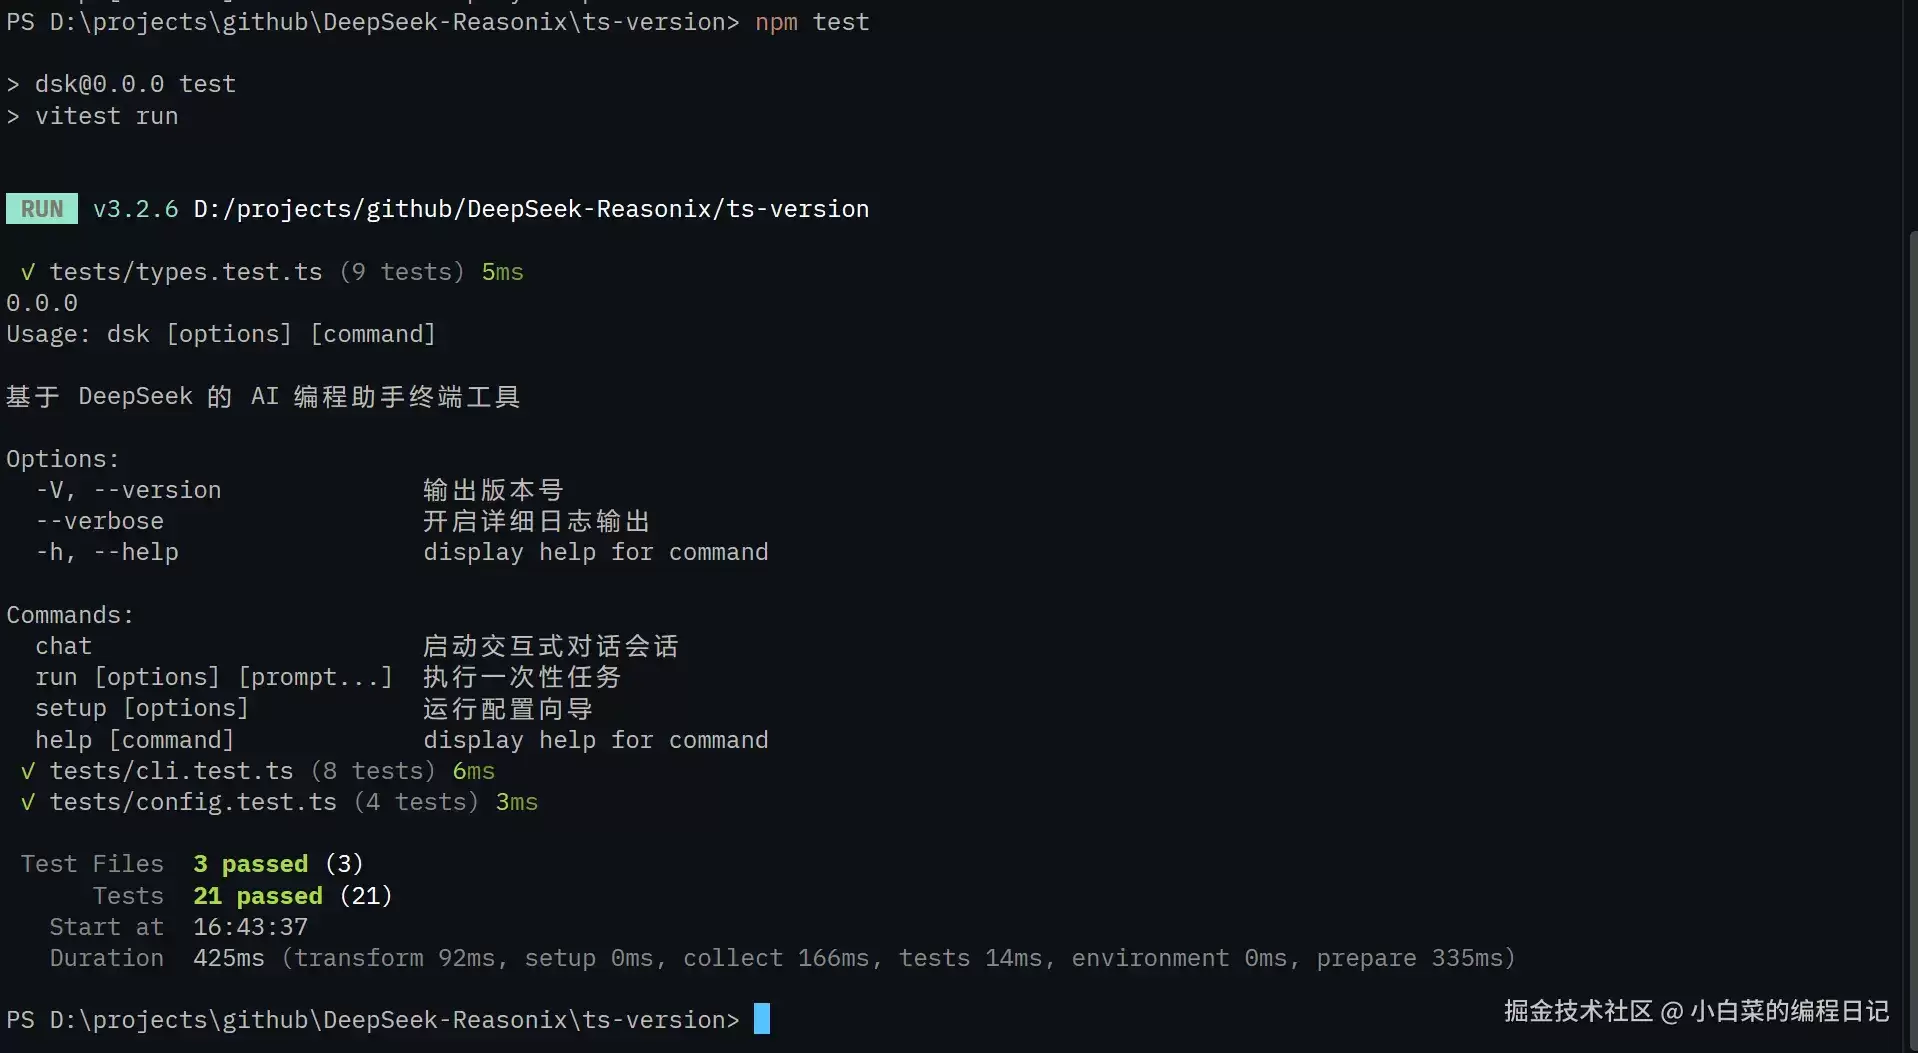
- 共计 21 条测试用例,全部顺利通过
- 完整代码仓库:github.com/Awu12277/de...
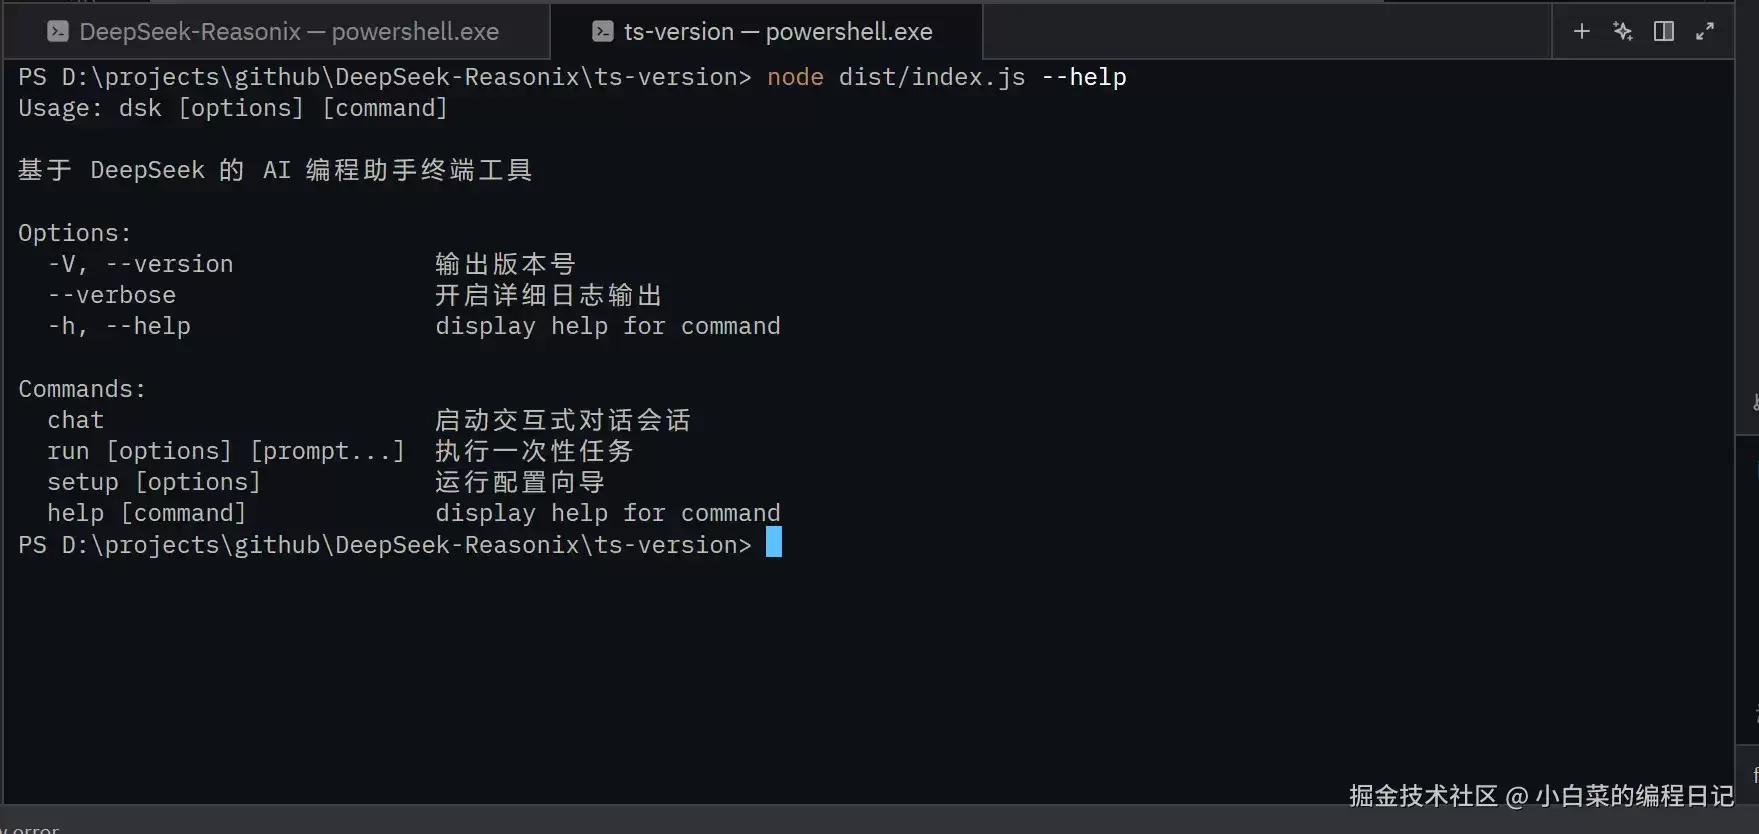
最终实现的效果如下:
前置条件
- Node.js 版本须大于等于 18(用到了原生 fetch 和 ESM 特性)
- npm(也可以选择 pnpm 或 yarn,本文以 npm 为例)
- 具备基本的 TypeScript 和 Node.js 知识储备
为什么要有这一章
许多 CLI 教程一上来就直接编写业务逻辑,用 commander 一把梭,全部代码塞在一个文件里。写到后面,你会发现:
tsconfig配置出错,CI 流程中类型校验无法通过- ESLint 配置仍然使用
.eslintrc这种老格式,与新版typescript-eslint不兼容 - 构建出来的产物体积庞大,导致
npx执行卡顿 - 由于缺乏测试用例,没有人敢于进行重构
这一章的目的,就是把这些潜在的坑提前填平,然后再正式开始开发。后续的每一章都将基于这个稳固的基础来增添功能。
第一步:包管理与项目结构
mkdir ts-version && cd ts-version
npm init -y
然后修改 package.json 文件。CLI 项目中的关键字段如下:
{
  "name": "dsk",
  "version": "0.0.0",
  "type": "module",
  "bin": {
    "dsk": "./dist/index.js"
  },
  "exports": {
    ".": {
      "import": "./dist/index.js",
      "types": "./dist/index.d.ts"
    }
  },
  "engines": {
    "node": ">=18.0.0"
  }
}
以下是对几个关键设计选择的原因说明:
"type": "module" 让 Node 将 .js 文件视为 ESM 模块。对于 CLI 项目而言,使用 ESM 的 import/export 语法比 CJS 的 require 更加简洁明了,而且 Node 18 及以上版本对 ESM 的支持已经非常稳定。不过,这样做会导致少量仅支持 CJS 的包无法使用,而我们所依赖的包(如 commander、smol-toml)均已支持 ESM。
bin.dsk 指向的是打包后的入口文件。执行 npx dsk 命令时,实际上就是在运行这个文件。当发布到 npm 后,用户通过 npm install -g dsk 进行全局安装,便可以在终端中直接输入 dsk 来使用。
exports 是 ESM 包的标配设置,它限制了外部只能导入我们所暴露的入口文件,从而避免他人导入内部的模块。
目录结构采用了按模块分层的设计:
src/
├── index.ts          # 入口文件,包含 shebang 和异常处理
├── cli/              # commander 命令路由
├── config/           # TOML 配置文件加载与合并
├── provider/         # LLM Provider 接口
├── tool/             # 内置工具接口
├── plugin/           # MCP 插件管理器
└── agent/            # Agent 会话循环
每个层级都是一个独立的模块,并且依赖方向是单向的:cli → {agent, config} → {tool, provider} → plugin。后续的章节将会对每个模块进行详细的展开讲解。
第二步:TypeScript 配置
tsconfig.json 是 TypeScript 项目的核心配置文件。如果配置有误,IDE 可能不会报错,但到 CI 环节就会出现问题。以下是具体的配置:
{
  "compilerOptions": {
    "target": "ES2022",
    "lib": ["ES2022"],
    "module": "NodeNext",
    "moduleResolution": "NodeNext",
    "resolveJsonModule": true,
    "isolatedModules": true,
    "strict": true,
    "noUncheckedIndexedAccess": true,
    "noImplicitOverride": true,
    "forceConsistentCasingInFileNames": true,
    "declaration": true,
    "declarationMap": true,
    "sourceMap": true,
    "outDir": "./dist",
    "rootDir": "./src",
    "esModuleInterop": true,
    "skipLibCheck": true,
    "verbatimModuleSyntax": true
  },
  "include": ["src/**/*.ts"],
  "exclude": ["dist", "node_modules", "tests"]
}
对一些重点选项的说明:
module: "NodeNext" 与 moduleResolution: "NodeNext" 的组合 — 这是 Node 18 及以上版本中 ESM 的标准配置方式。TypeScript 会按照 Node 的 ESM 规则来解析模块,因此 import 语句必须附带 .js 后缀。为什么使用 .js 而不是 .ts?因为 TypeScript 编译后生成的是 .js 文件,Node 在运行时查找的是 .js 文件。
verbatimModuleSyntax: true — 此选项强制开发者区分类型导入(type import)和值导入(value import)。使用 import type { Config } 后,该语句在运行时不会产生任何代码,实现纯净的类型擦除。习惯这种写法后,tsc 的编译速度会有所提升。
noUncheckedIndexedAccess: true — 对于数组下标访问,此选项会返回 T | undefined 类型,强制开发者处理 undefined 的情况。CLI 工具最担心运行时突然出现 Cannot read properties of undefined 错误,这个选项能够提前规避不少这类问题。
strict: true — 开启所有严格检查项。这是 TypeScript 的主要优势之一,如果不开启严格模式,不如直接使用 JavaScript。
outDir 和 rootDir 分开设置 — rootDir 设置为 src,outDir 设置为 dist,这样构建产出的目录结构能够与源码保持一一对应。
第三步:安装依赖
npm install commander smol-toml
两个运行时依赖:
- commander — Node CLI 框架。选择它而不是 yargs 的原因是:commander 的 API 更加直观(支持链式调用),对 TypeScript 的支持良好,社区也比较活跃。yargs 的
.parse()和.argv行为对于新手来说显得有些奇怪。 - smol-toml — TOML 解析器。选择它而不是
@iarna/toml是因为:smol-toml是纯 ESM 实现,与我们的"type": "module"设置无缝兼容,并且其体积仅为@iarna/toml的四分之一。
开发依赖:
npm install -D typescript tsup vitest eslint prettier @types/node
npm install -D @eslint/js typescript-eslint
- tsup — 基于 esbuild 的打包工具。构建速度极快,相较于
tsc,其打包速度提升了 10 倍以上。 - vitest — 测试框架。它与 Vite 共享配置格式,但可以独立运行,无需依赖 Vite。
- eslint + typescript-eslint — 使用新版 flat config 并启用类型感知规则。
第四步:ESLint + Prettier
ESLint flat config
新版 ESLint(v9 及以上)统一使用 eslint.config.mjs 文件,不再支持 .eslintrc 格式。mjs 后缀表示这是一个 ESM 模块文件:
import eslint from "@eslint/js";
import tseslint from "typescript-eslint";
export default tseslint.config(
  { ignores: ["dist/", "node_modules/", "coverage/"] },
  eslint.configs.recommended,
  ...tseslint.configs.strictTypeChecked,
  ...tseslint.configs.stylisticTypeChecked,
  {
    languageOptions: {
      parserOptions: {
        projectService: true,
        tsconfigRootDir: import.meta.dirname,
      },
    },
  },
  {
    rules: {
      "@typescript-eslint/no-explicit-any": "warn",
      "@typescript-eslint/no-unused-vars": [
        "error",
        { argsIgnorePattern: "^_", varsIgnorePattern: "^_" },
      ],
      "@typescript-eslint/consistent-type-imports": [
        "error",
        { prefer: "type-imports" },
      ],
      "@typescript-eslint/no-import-type-side-effects": "error",
      "no-console": "off",
      "prefer-const": "error",
      "no-var": "error",
      eqeqeq: ["error", "always"],
    },
  },
);
typescript-eslint 的 v8 版本引入了 tseslint.config() 辅助函数,它能够自动处理配置的合并逻辑,相比 export default [...] 的数组写法更加安全。
projectService: true 是 v8 版本的新模式,ESLint 通过 Language Server 与 TypeScript 进行交互。这种方式比旧的 project: "./tsconfig.json" 性能更好,并且无需重新编译 tsconfig。
关于规则的说明:
no-explicit-any设置为 warn 而非 error,因为在与外部 API 交互时偶尔会用到any,如果被阻止会有些烦人。no-unused-vars添加了argsIgnorePattern来忽略以_开头的参数,这种情况在 commander 的 action handler 中很常见。consistent-type-imports强制使用import type,这与tsconfig中的verbatimModuleSyntax设置相互配合。
Prettier
.prettierrc 配置,越简洁越好:
{
  "semi": true,
  "singleQuote": false,
  "trailingComma": "all",
  "printWidth": 90,
  "tabWidth": 2,
  "arrowParens": "always",
  "endOfLine": "lf"
}
使用双引号、分号和尾逗号是 TypeScript 项目的社区惯例。将 printWidth 设置为 90,比默认的 80 要宽一些,因为 TypeScript 的类型标注通常比较长,80 列的宽度经常会导致换行。endOfLine: lf 则确保在 Windows 和 macOS 上格式保持一致。
第五步:cli 入口与 commander 外壳
先编写 src/cli/index.ts 文件,这是 CLI 的路由层:
import { Command } from "commander";
export function createCli(): Command {
  // 使用 exitOverride 阻止 process.exit(),方便测试 --help 和 --version
  const program = new Command();
  program.exitOverride();
  program
    .name("dsk")
    .description("基于 DeepSeek 的 AI 编程助手终端工具")
    .version("0.0.0", "-V, --version", "输出版本号")
    .option("--verbose", "开启详细日志输出")
    .hook("preAction", (_thisCommand, _actionCommand) => {
      // TODO(第14章): 加载配置、鉴权检查、初始化日志
    });
  // 子命令: chat
  program
    .command("chat")
    .description("启动交互式对话会话")
    .action(async () => {
      console.log("dsk chat — 待实现(第07章)");
    });
  // 子命令: run
  program
    .command("run")
    .description("执行一次性任务")
    .argument("[prompt...]", "任务描述")
    .option("--model ", "指定使用的模型")
    .action(async (_prompt: string[]) => {
      console.log("dsk run — 待实现(第07章)");
    });
  // 子命令: setup
  program
    .command("setup")
    .description("运行配置向导")
    .option("--export", "以 JSON 格式导出配置")
    .option("--test", "测试 API Key 连通性")
    .action(async () => {
      console.log("dsk setup — 待实现(第14章)");
    });
  return program;
}
为什么使用 exitOverride()?
commander 默认在显示 --help 和 --version 时会调用 process.exit(0)。这在生产环境中没有问题,但在测试时,一旦调用 process.exit(),vitest 进程会直接退出,导致无法进行测试。exitOverride() 将 process.exit() 替换为抛出 CommanderError,测试代码可以捕获这个 error 来进行验证。
入口文件 src/index.ts 负责处理这个异常:
#!/usr/bin/env node
import { createCli } from "./cli/index.js";
const program = createCli();
try {
  await program.parseAsync(process.argv);
} catch (err: unknown) {
  const error = err as { exitCode?: number; code?: string };
  if (error.code === "commander.helpDisplayed" || error.code === "commander.version") {
    process.exit(error.exitCode ?? 0);
  }
  console.error(String(err));
  process.exit(1);
}
#! shebang 语句告诉操作系统这是一个 Node.js 脚本。打包后的 dist/index.js 文件的第一行就是它,因此 npx dsk 能够直接执行。
第六步:接口定义(为后续章节搭建框架)
首先定义好核心接口,后续章节可以直接导入使用:
Provider 接口
// src/provider/index.ts
export interface ChatMessage {
  role: "system" | "user" | "assistant" | "tool";
  content: string;
  toolCallId?: string;
  name?: string;
}
export interface ChatOptions {
  signal?: AbortSignal;
  maxTokens?: number;
  temperature?: number;
}
export interface ChatChunk {
  content: string;
  finishReason: "stop" | "tool_calls" | "length" | null;
  usage?: {
    promptTokens: number;
    completionTokens: number;
    cachedPromptTokens?: number;
  };
}
export interface Provider {
  readonly name: string;
  chat(
    messages: ChatMessage[],
    opts?: ChatOptions,
  ): AsyncIterable<ChatChunk>;
  model(): string;
}
chat 方法返回的是 AsyncIterable<ChatChunk> 而非 Promise<string>,这是因为 LLM 的输出是流式的。调用方可以通过 for await (const chunk of provider.chat(...)) 的方式逐块渲染到终端。
Tool 接口
// src/tool/index.ts
export interface JSONSchema {
  type: "object";
  properties?: Record<string, unknown>;
  required?: string[];
  additionalProperties?: boolean;
}
export interface ToolContext {
  cwd: string;
  signal?: AbortSignal;
}
export interface ToolResult {
  success: boolean;
  data: string;
  error?: string;
}
export interface Tool {
  readonly name: string;
  readonly description: string;
  readonly parameters: JSONSchema;
  execute(args: unknown, ctx: ToolContext): Promise<ToolResult>;
}
parameters 使用 JSONSchema 来描述参数,LLM 可以通过这个 schema 来了解如何调用工具。
Config 类型
// src/config/types.ts
export interface ProviderConfig {
  name: string;
  baseUrl?: string;
  apiKey?: string;
  model: string;
}
export interface ToolConfig {
  name: string;
  enabled: boolean;
}
export interface PluginConfig {
  name: string;
  command: string;
  args?: string[];
  env?: Record<string, string>;
}
export interface Config {
  defaultProvider: string;
  providers: ProviderConfig[];
  tools: ToolConfig[];
  plugins: PluginConfig[];
}
对应的默认配置加载器:
// src/config/loader.ts
import { readFile } from "node:fs/promises";
import { join } from "node:path";
import { parse } from "smol-toml";
import type { Config } from "./types.js";
export const defaultConfig: Config = {
  defaultProvider: "deepseek",
  providers: [
    {
      name: "deepseek",
      baseUrl: "https://api.deepseek.com",
      model: "deepseek-chat",
    },
  ],
  tools: [
    { name: "read_file", enabled: true },
    { name: "write_file", enabled: true },
    { name: "edit_file", enabled: true },
    { name: "bash", enabled: true },
    { name: "glob", enabled: true },
    { name: "grep", enabled: true },
    { name: "ls", enabled: true },
    { name: "fetch", enabled: true },
  ],
  plugins: [],
};
export async function loadConfig(configPath?: string): Promise<Config> {
  const candidates: string[] = [];
  if (configPath) {
    candidates.push(configPath);
  } else {
    candidates.push(
      join(process.env.HOME ?? process.env.USERPROFILE ?? "~", ".config", "dsk.toml"),
      join(process.cwd(), ".dsk.toml"),
    );
  }
  let config: Config = structuredClone(defaultConfig);
  for (const candidate of candidates) {
    try {
      const raw = await readFile(candidate, "utf-8");
      const parsed = parse(raw) as unknown as Partial<Config>;
      config = mergeConfig(config, parsed);
    } catch {
      // 如果文件不存在或无法读取,则跳过
    }
  }
  return config;
}
function mergeConfig(base: Config, overlay: Partial): Config {
  return {
    ...base,
    ...(overlay.defaultProvider !== undefined && { defaultProvider: overlay.defaultProvider }),
    ...(overlay.providers !== undefined && { providers: overlay.providers }),
    ...(overlay.tools !== undefined && { tools: overlay.tools }),
    ...(overlay.plugins !== undefined && { plugins: overlay.plugins }),
  };
}
配置的加载顺序为(后加载的配置会覆盖前面的):
- 内置的默认值
- 用户全局配置文件
~/.config/dsk.toml - 项目本地配置文件
.dsk.toml
使用 structuredClone 进行深拷贝,是为了防止多次调用 loadConfig 时共享同一个 defaultConfig 对象。
第七步:构建配置(tsup)
tsup.config.ts 配置文件:
import { defineConfig } from "tsup";
export default defineConfig({
  entry: ["src/index.ts"],
  format: ["esm"],
  target: "node18",
  clean: true,
  dts: true,
  sourcemap: true,
  minify: process.env.NODE_ENV === "production",
  shims: true,
});
format: ["esm"] — 只生成 ESM 格式的产物。由于我们面向的是 Node 18 及以上版本,不需要兼容 CJS。
dts: true — 生成 .d.ts 声明文件,方便被其他 ESM 项目导入。
clean: true — 在打包前自动清空 dist/ 目录,避免旧文件残留。
shims: true — tsup 会注入一些 polyfill,例如 __dirname、__filename 的 ESM 兼容实现。虽然我们尽量不使用这些 CommonJS 遗留变量,但 commander 等依赖包可能会用到。
minify: process.env.NODE_ENV === "production" — 在开发阶段不进行代码压缩,方便调试。只有在发布时才进行压缩。
第八步:Vitest 测试
vitest.config.ts 配置文件:
import { defineConfig } from "vitest/config";
export default defineConfig({
  test: {
    globals: true,
    include: ["tests/**/*.test.ts"],
    coverage: {
      provider: "v8",
      include: ["src/**/*.ts"],
      reporter: ["text", "lcov"],
    },
  },
});
globals: true — 启用后,在测试文件中可以直接使用 describe、it、expect 等全局函数,无需手动导入。这是个人偏好,团队项目可能更倾向于显式导入以提高清晰度。
总共编写了 21 条测试用例。以下是其中几个具有代表性的例子:
CLI 命令注册测试
import { describe, it, expect } from "vitest";
import { createCli } from "../src/cli/index.js";
describe("createCli", () => {
  const cli = createCli();
  it("should return a Command instance with name dsk", () => {
    expect(cli.name()).toBe("dsk");
  });
  it("should register the chat subcommand", () => {
    const chatCmd = cli.commands.find((c) => c.name() === "chat");
    expect(chatCmd).toBeDefined();
    expect(chatCmd!.description()).toBe("启动交互式对话会话");
  });
  it("should output help with --help", async () => {
    // exitOverride 使得 Commander 会抛出一个 CommanderError,其 exitCode 为 0
    await expect(
      cli.parseAsync(["node", "dsk", "--help"]),
    ).rejects.toMatchObject({ exitCode: 0 });
  });
});
这个测试用到了 commander 的 exitOverride 特性。在正常模式下,parseAsync(["node", "dsk", "--help"]) 会调用 process.exit(0),导致 vitest 进程被终止。启用 exitOverride 后,parseAsync 返回的 Promise 会 reject 一个 CommanderError,我们只需在测试中断言 exitCode: 0 即可。
配置结构测试
describe("defaultConfig", () => {
  it("should list all 8 built-in tools", () => {
    expect(defaultConfig.tools).toHaveLength(8);
    const names = defaultConfig.tools.map((t) => t.name).sort();
    expect(names).toEqual([
      "bash", "edit_file", "fetch", "glob",
      "grep", "ls", "read_file", "write_file",
    ]);
  });
});
这类测试乍看起来“简单到没必要写”,但其真正的价值在于回归保护——如果有人将来不小心修改了默认配置,测试会第一时间发出警告。
类型完整性测试
it("Tool interface is structurally sound", () => {
  const mock: Tool = {
    name: "echo",
    description: "echoes input",
    parameters: { type: "object", properties: {} },
    execute: async (_args: unknown, _ctx: ToolContext) => ({
      success: true,
      data: "pong",
    }),
  };
  expect(mock.name).toBe("echo");
});
这类测试一半是在做类型检查(TypeScript 在编译期验证接口的结构),一半是在做运行时验证(确保 mock 对象能够正常工作)。在后续编写具体工具实现时,这个 mock 可以直接复用。
跑一下验证
# 安装依赖
npm install
# 21 条测试全部通过
npm test
# 类型检查
npm run type-check
# 构建
npm run build
# 运行 CLI
node dist/index.js --help
node dist/index.js --version
node dist/index.js chat
测试输出结果如下:
构建产物:
ESM distindex.js     1.42 KB
ESM distindex.js.map 3.43 KB
DTS distindex.d.ts   20.00 B
只有 1.42KB,对于一个 CLI 项目来说,这样的体积负担几乎可以忽略不计。esbuild 已经将 commander 和 smol-toml 全部打包进去了。
项目记忆(AGENTS.md)
最后,创建一个 AGENTS.md 文件,用于记录项目的关键约定。后续的 agent 会自动读取该文件,作为项目上下文:
# dsk — 项目记忆
## 关键约定
- **界面语言**:所有用户可见的描述性文字使用中文。
- **命令标识**:CLI 命令名和选项名保持英文。
- **代码注释**:注释使用中文。
- **代码标识符**:变量名、函数名、接口名保持英文。
## 技术栈
- Node.js >= 18, TypeScript (ES2022, ESM)
- CLI: commander, 配置: smol-toml
- 构建: tsup, 测试: Vitest
- API: 原生 fetch (Node 18+)
## 配置层级
1. 内置默认值
2. 用户全局 ~/.config/dsk.toml
3. 项目本地 .dsk.toml
总结
完成本章内容后,我们已具备以下能力:
| 能力 | 工具/配置 | 状态 |
|---|---|---|
| CLI 框架 | commander (chat/run/setup) | 骨架已搭建 |
| 配置加载 | smol-toml + 分层合并 | 接口已就绪 |
| 类型安全 | strict tsconfig + typescript-eslint | 全面覆盖 |
| 测试 | Vitest,21 条用例 | 全部通过 |
| 构建 | tsup,产物仅 1.42KB | 一步打包 |
| 代码规范 | ESLint + Prettier | 实现自动化 |
| 项目记忆 | AGENTS.md | 记录约定 |
完整代码仓库:github.com/Awu12277/de...
下期预告
下一章将实现 CLI 框架的完整子命令路由,其中包括命令参数解析、全局中间件、退出码规范以及 shell 自动补全功能。
如有任何问题,欢迎留言讨论。
延伸阅读
- Commander.js 官方文档
- TypeScript ESM 官方指南
- typescript-eslint v8 迁移指南
- tsup 配置参考
- Vitest 入门指南